
I have had so many emails wanting me to make a draped shirt vest with sleeves, out of a t-shirt or a long sleeve tee. I have finally made this one out of two short sleeve t-shirts, but if you wanted to make a draped shirt out of two long sleeve t-shirts, it would work the same way.
Although my first draped vest required no sewing,
this does require a basic straight sewing stitch.
or a serger, if you have one.

Tutorial
Things you need

- Two t-shirts *I have one medium mens and one large mens.
- Scissors
- Sewing machine
- Grey thread
- Straight Pins


#1
The mens medium shirt
A. Cut off the collar
B.Cut a straight line down the middle of the mens medium shirt. Only the front layer.


The mens large shirt
A. Cut off the arms,B. Cut a straight line right below the collar
C. Cut a straight line down each side of the shirt. Your intention is to make two rectangle pieces.


#3
A. Take one of your rectangle pieces and putting right sides together pin it, then sew it to one side of your shirt.
Do the same to the other side.
B. Trim the bottom of the shirt to match up with the part that was sewed on.

# 4
Hem the top edge all the way around the collar and down the other side.
The two rectangle pieces make the perfect drape.

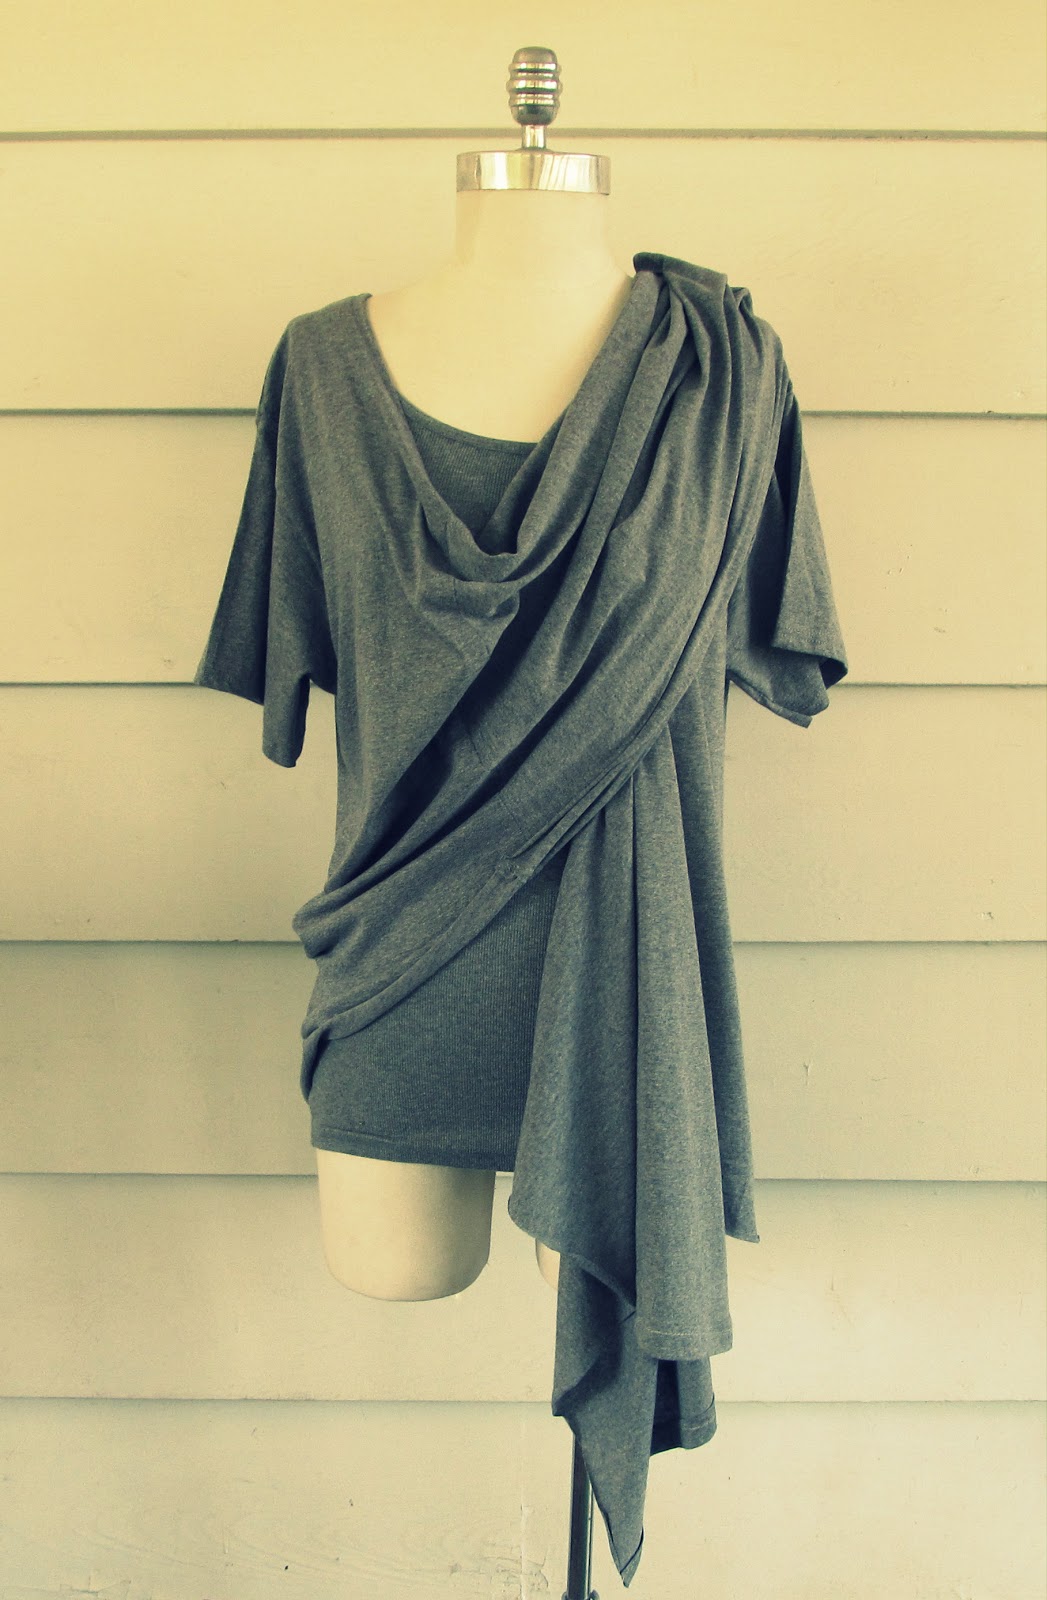
Wrap it.

Tie it.

Back
Wear it

For my other 5 minute draped vest
head HERE.
I hope this answers some of those Emails.
Have a wonderful Monday.
Lots of <3
Anne
Love pieces you can wear more than one way. Also would love this in a black long sleeve version :) Have posted it on my Tumblr Blog - but used three photos (all finished pieces) to show how you could wear it in different ways. Hope this is OK!
ReplyDeleteOf course it is wonderful.. and I thank you so much:)
DeleteYou have the best tutorials, when and if I make this (which I really want too) all credit to you!!!
ReplyDeleteThank you so much Michelle.
DeleteExcellent! Thank you for sharing!!!
ReplyDeleteAmazing DIY! I will try this with my black tees. Thanks for the tutorial.
ReplyDeletex Natasha
http://freeurcloset.wordpress.com
Thank you Natasha:)
DeleteUmm - but if you cut the medium shirt down the front, why do you still have a round neck tee under the drape ? Or is that a 3rd tee shirt. Love the look, but puzzled.
ReplyDeleteThat is just a tank top I have under the shirt.:)
DeleteI love this....will have to try it SOON!!
DeleteMaybe a different color tank would show off the finished product better :-) ;-)
Awesome:)
Deletei LOVE this!! another to add to my list to try!
ReplyDelete[oomph.]
Thank you :)
DeleteCould I do this with plain sweatshirts? Or do you think the fabrics would be too thick?
ReplyDeleteI have never tried it with a sweatshirt. I might have to, just to see how it works.
DeleteThis is awesome! I love it. I am always looking for new ideas and since I'm plus-sized using regular patterns is often a no-go. However, this can be done with any size of t-shirt, which means I can do it! Thanks for sharing.
ReplyDeleteThis is awesome! I love it. I am always looking for new ideas and since I'm plus-sized using regular patterns is often a no-go. However, this can be done with any size of t-shirt, which means I can do it! Thanks for sharing.
ReplyDeleteI find that you have an enormous talent for creativity with T shirts. Thanks
ReplyDeleteI LOVE YOUR TUTORIALS!!! They are really amazing and great for any occasion :D
ReplyDeleteUmm, after step 2, I don't really understand how to proceed with step 3. Could you please explain how you attached the two resctangular pieces of the 2nd shirt onto the 1st one to create the drape? Thanks!!!
You just sew them to each piece. Re read step number 3. If you still have trouble I will send you a different drawing:)
DeleteThank you so much :)
DeleteI understand through step #3 with sewing on the rectangles, but you lost me on trimming the bottom and exactly where to do the hemming. Can you clarify those for me? LOVE your ideas!
ReplyDeleteThanks!
I just hemmed the raw edges... up one side of the sewed on flaps around the collar and back down the other side.
Deletei just trimmed the front- bottom part of the first shirt to make the two shirt flow together better.
I hope that helped:)
DeleteAbsolutely love this and can't wait to try it out. I've had 80 repins just TODAY! How would you feel about me creating these to sell in my Etsy shop?
ReplyDeleteCan you Email me. :)
DeleteAmazing! I am in awe and hope to help my tween move into more mature fashions without killing my budget. :O)
ReplyDeleteThis comment has been removed by the author.
ReplyDeleteI will work on one:)
ReplyDeleteThis is so neat! Thanks for sharing your very detailed tutorial.
ReplyDelete