

I have the exciting opportunity to head to the beach for a couple of
days, to relax and soak up a little of that beautiful Florida sunshine. I
wanted to do one more halter top to take to wear with my jeans and this
is what I came up with. It can be changed in so many ways let's just say
this is a 3 in one shirt. It seems like I am packing all of my DIY tops
and dresses to wear.
Video

Tutorial
Things You Need.

- Tee-Shirt~ mine is a mens medium
- Scissors
- Chalk

Front
Cut where the red lines are.

The back
cut the red lines
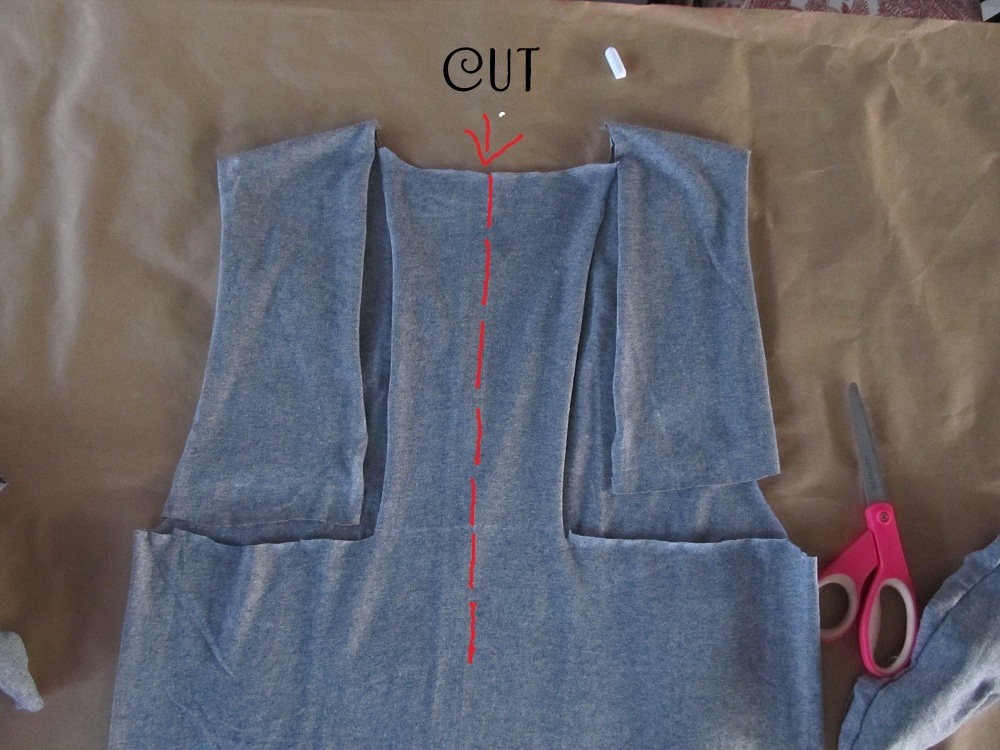
Back
Cut down the middle of the back cut out..

Front after cutting
NOTE* you cut one continuous line from the front to the back.
NOTE* you cut one continuous line from the front to the back.

Back After cutting

now tie the front
wrap around your neck
and tie to the two straps in the back.

If you want to trim off the excess off the straps.
I am leaving mine so I can play and change it up some more..


For those of you who need to watch it being made Like me
Here is a video just for you:)
Click me>VIDEO<click me
Just one more way to change up a Tee Shirt..
Happy Monday.
Lots of <3,
Parabéns... Ficou muito lindo!!!
ReplyDeleteEstou aprendendo muito com você.
Depois vou postar no meu blog esse e Re-Style Fix Heel # 47 Glitter.
Maravilhoso!!!
Beijos
anapaula_mamy@hotmail.com
Very cute! Love it!
ReplyDeleteCan you make this in a teens size?
DeletePlease reply : )
Of course... just use a size close to your size,
Deletemaybe a mens, small hanes tee-shirt.
This is gorgeous! :)
ReplyDeleteThank you so much :)))
DeleteHow do you chose what size of T shirt to purchase? Do you use a T that you would normally wear, or one that is a size larger
ReplyDeletea mens medium still gives me a little room to play with. I wear a medium women's size in real life. I weigh 135 and I am 5'7" maybe you can judge your size from how big I am. I hope this helps:)
DeleteI am about 3' shorter and weigh about the same, I used an Adult Large because I couldn't run to the store right now and was anxious to try this out! I am going to the beach and can't wait to show it off! :) Thanks!
DeleteI am typcially a small (4-6) in women's sizes. I tried this with a men's medium tee and it worked out good. I may try a men's small and see how I like it - it may help with the the little bit of gaping under the arms and provide a little more fitted look. Great project - very clever!
DeleteOK, totally love this too!! Guess I'll have to buy a bunch of cheap t-shirts at Walmart so I can try every variation!
ReplyDelete-Michelle-
That cute ... I would like something like that!:)
ReplyDeleteGeweldig idee zeg. Ik heb van het weekend je hele blog doorgelezen. Heel vindingrijk allemaal
ReplyDeleteImre (Nederland)
geweldig .. dank je wel
DeleteLOVE IT THANK YOU!!
ReplyDeleteFantastic! Tnx sooo much!
ReplyDeleteThis is too cool, going make it right now!!!!
ReplyDeletepossibly my favorite one so far! i am running right home and making this tonight. NO t-shirt will be safe! LOL thanks so much!
ReplyDeleteI looooooove these ideas! i'm a plus size but these ideas work for any size so any woman can look cute and original. a big thank you. x charlot
ReplyDeleteLove this makeing it in every color I can get my hands on.
ReplyDeleteJust made this, love it! But wish I hadn't used a shirt with a seam over the shoulder.
ReplyDeleteSuch a great idea, love it!
ReplyDeletewww.sparklychicjewels.com
You are BRILLIANT!
ReplyDeleteAww thank you so very much!!:)
DeleteI love how this turned out! Simply amazing! Great idea!
ReplyDeleteI hope you will consider hopping on over to SewSet, my new on-line sewing directory, and uploading this as well as some of your other tutorials and patterns so others can find it and you as well!
Thanks so much for sharing - I am so glad I found you!
- Jess
SewSet.com
MeSewCrazy.com
Thank you. I will definitely check it out:)
DeleteI love it! Not only am I going to make one for myself, but a matching one for my daughter!!
ReplyDeleteKeep the ideas coming!! I will be purchasing some mens T's tonight!!!
ReplyDeleteWow that's so neat! I'm definitely sporting this for the summer!
ReplyDeleteSo glad we're the same size! Takes the guesswork out of figuring out what size of shirts to buy.
ReplyDeleteNice work!
ReplyDeletethis is a great idea! will def be trying this out :)
ReplyDeleteLove!!
ReplyDeleteI messed up on the front somehow. Was I supposed to leave the front collar on? I am so bad at DIY, still working on it.
ReplyDeleteThanks so much for sharing this. I just had my scissors professionally sharpened, so look out t-shirts, here I come.
ReplyDeleteYou are a genius!
ReplyDeleteSallie, MO
thank you so much!:)
Deletegreat idea. I am so excited to try it. tanks for sharing the idea.
ReplyDeleteJust made one of these shirts. :-) Still have to play with it a little but I LOVE it. Thank you!! :-)
ReplyDeleteIs there anything you CAN'T do with a t-shirt? I love your tutorials!
ReplyDeleteIs there anything you CAN'T do with a t-shirt? I love your tutorials!
ReplyDeleteHow do you make the front look that way??? I made one and the front of it does not look the same as the obe shown
ReplyDeleteI had the same issue
DeleteCool. I can totally see it as a color blocked beachy maxi dress with a couple of other tees lopped off and sewn to the bottom. Maybe a sexy leg slit to give some room to move? Maybe a band of fabric to use as a belt, too. A plain teeshirt dress with a band of fabric for a belt was the rage in the 80's.
ReplyDeleteyes that would be awesome:)
DeleteYou are awesome. I am a plus-sized girl and clothes for us are expensive. I am using some of my husband's shirts he gets free from work (and never wears) to make some! Your tutorial is so easy to follow!
ReplyDeleteThis is so cute- I'm trying this for one of my Pinterestpalooza posts: ). Some of my other projects have been...interesting.,lol...so anxious to see how this one turns out!
ReplyDeletewww.followingbutterflies.org
Just tried it and it was a success!! Thanks for being my first Pinterest project attempt!
ReplyDeleteAwesome so great!!
DeleteThis is great! The only problem I have with mine is a strange bulge in the chest area. Any suggestions of how to fix it?
ReplyDeleteTry and tie it as neat as possible. my bulges just a little but that is part of the look. I just played with mine until it looked the way I wanted it to.
DeleteFantastic! I have a stack of my husband old shirts I'm going right now to try it!
ReplyDeleteGenius!
ReplyDeleteThank you:)
DeleteMy daughter followed your directions and shirt is great. It is a 4H project. She is showing different ways to up cycle tshirts! Thank you!
ReplyDeleteThat is so great I did a Design class last summer and the girls came up with the best ideas. This makes me smile...thank you for sharing..
DeleteI would LOVE to do some of these no sew tops with my husbands old t-shirts. (he's lost over 50lbs and has gone from an XL shirt to a Med.) How can I make his old T's into awesome tops for me when his old shirts are XL and I normally wear a small in women's? Any suggestions? :/ Thanks for sharing your awesome craftiness with the rest of us.
ReplyDeleteThank you so much. Funny you ask this question because I just made a top from an XL shirt that you will be able to use. It is an off the shoulder shirt and you need an XL shirt, because of how the shirt is designed. that tutorial should be coming up in a day or so. I have a couple of other ideas but they are sundresses and or longer shirts. I hope you come back and check them out.:)
DeleteThanks so much for sharing! I first tried it on not crossing the front and went straight back. Wasn't too bad looking. Then did it the way you show. This is so cute! Thanks again.
ReplyDeleteAwesome! Thank you so much. I would love to see a picture.
DeleteI just got done making mine! Its so cute! My only question is- I'd like the shirt to be a little longer, but not sure how to do that without getting a way too big size? Any suggestions? BTW- blogging about this tonight: ) Thanks for the ideas!
ReplyDeleteBrandy
www.followingbutterflies.org
mm I will have to think about the question you have asked, I am sure there is a solution. :)I cant wait to see.
DeleteI have thought about buying a mens shirt in your size but a tall? I know Hanes has a tall line. Depending on your height and the size you get it might even work out as a mini dress.
DeleteSorry! Ment 'have you thought about' lol. Its been a long day! :c)
Deletethat is a great idea.:) thanks so much
DeleteHere is mine - I like the result! Thank you!
ReplyDeletehttp://sweetbaydaily.blogspot.com/2012/07/diy-t-shirt-halter.html
This comment has been removed by the author.
ReplyDeleteI absolutely LOVE your t-shirt fashions. I made this and love it. I cut strips in the halter part and braided them. It hid the seam lines from the shoulders and added some extra style. Thank you! :)
ReplyDeleteAwesome I would love to see!!:)
DeleteAnd Thank you so much!
Do you have any other tshirt upcycles?? I am loving all the ones you have done and I have tried them all was just wondering do you have anymore ideas..... amberkirk97@hotmail.com
ReplyDeleteHi! :)
ReplyDeleteI love this so much, I featured it in a blog post! :D Keep up the great work :)
Here's the link:
http://thegentleflower.blogspot.no/2012/08/up-cycled-crafts-clothing-home-decor.html
Katrine :)
thegentleflower.blogspot.com
holy cow this is awesome! can't wait to try it!
ReplyDeleteThank you Lucy!:)
Deletegreat tutorial! just found this via pinterest... the Today Show pinned it!
ReplyDeleteThank you Katie !! :))
DeleteI just made mine! It only took 10 minutes! I did modify the straps the back ones were a little too short, so I just tied the front straps as directed and then tied the remainder of those straps around my neck a halter top and tied the back straps upon themselves in a bow it still looked awesome! thanks!!!
ReplyDeleteJust made one! The straps on mine were MUCH shorter though, just long enough to tie, probably because I used an adult medium and I am normally a small. Or maybe I did something "wrong," but it still looks super cute! Thanks so much!
ReplyDeleteThis is awesome! I tend to get a lot of guys shirts with nerdy things on the front (because they don't always have big enough women's sizes on these websites). And I've been trying to figure out how to "girl them up" a bit. This is perfect! Thanks so much!
ReplyDeleteGreat idea!!
ReplyDeleteMine didn't look as cute, but I used a giant t-shirt and cut it too much in the arms. It looks really cute on my daughter's bff, layered with camis!
ReplyDeleteThis comment has been removed by the author.
ReplyDeleteLet's just start off by saying I love this!! I am usually a womens medium and i used a mens medium, it's a bit snug, so i know to use a large next time. it could just be the brand though, so hopefully the large works! I just came across this site last night on pintrest, and i was so excited to try all your "no-sew" diy shirt projects! this was the first one, and i'm about to do more! :) THANK YOU!
ReplyDeleteWhere did you get the body form? It's adorable!
ReplyDeleteI was so lucky I was given all of my forms:)
DeleteWow! Nice tutorial! I will try this at home! I'm excited to wear my own DIY halter shirt :)
ReplyDeletexoxo,
Sai of http://www.fashionbysai.com
Thanks from France :))
ReplyDeleteThis is very impressive. Apparently, you are seriously into fashion, Anne. I’ve seen some of your experiments and you really are great in turning simple t–shirts into a fabulous outfit. Nice! Anyway, this customized halter is chic! The details are so clean and flawless. There are no signs that it was once a plain shirt. Just brilliant! With that, I’ll be looking forward to more of your amazing creations. Thumbs up!
ReplyDeleteLinda Fox
I've been tying it a bunch of ways and so far in addition to the ways you posted I've been able to make it a backless halter with a bow, a peplum, and a mini skirt XD
ReplyDeletemy friend and i did it thank u oh so very much :) it beautiful..
ReplyDeleteAwesome, thank you:)
DeleteI'm glad that I obsessed over the cutting lines, it's worth noting that the front straps go all the way to the back and are still connected. I didn't get that right away. What a great idea! Thanks for sharing!
ReplyDeleteI put a note on the project. thank you so much for your input. :)
DeleteIt is really looking very attractive post. I liked it.
ReplyDeleteA+ Student T-shirt
Chillin T-shirt
WONDERFUL!!! I was looking for a simple tutorial for "re-working" some tees. My BFF printed me a dozen of my fave tee, but in differnt colors. I'm a red head, so I don't wear yellow or orange...guess which tee I'm going to try this with?
ReplyDeleteTHANK YOU so much for sharing this!!!
How do you do the from tying part?
ReplyDeleteyou just tie them and then wrap the two straps around your neck.
DeleteHow clever!! I love this :O
ReplyDeleteI feel so lucky to find you I make one for yoga with sport bra how I get other style. My e mail vickie2119@gmail. com thank you
ReplyDeleteI found this tutorial and used it on an old tshirt I never wore... but it turned out amazing! It's really cute! :-) Thanks for posting this tutorial! It was really simple and easy to follow. I love how my shirt turned out ~
ReplyDeleteThat is awesome.. Thank you :)
DeleteMine ending up not being no-sew. I'm chesty, knot kept riding up, had to tack it in place. The back ties were uncomfy, tailored them. Super cute idea though. Thanks for the inspiration!
ReplyDeleteCould not decide between this & the halter #2. So made this and tied the middle straps of the back together as a cute small bow. So, I can still use the shirt either way. Also, tying the little bow in the bottom of the back makes it a bit more shapely and form fitting. LOVE THIS! Thanks for the great idea!
ReplyDeleteI took a chance today and made this. It's cute! I took it a bit further and on the front straps I cut them in three strips and braided them. Had to trim a bit thinner at the stitching to make it a smoother braid. I like it. I did unbraidi one strap and loved the look of the three strap look too. Thanks for the idea!
ReplyDeleteSo Happy you tried it:) Big hug!
DeleteI used my boyfriends shirt. It was pretty big to start with. As I have a small frame and I am 5'2". I do have big boobs. I was just wondering what I can do to make it better. I love you idea and it is very simple! Thanks for sharing!
ReplyDeleteReply
I think I would start with a shirt that was just one size bigger than your normal size. That should do the trick.:)
DeleteHi, I am with Sage Magazine and we would love to feature this in our April Issue. Just let us know if you are interested, thanks!! sagemagazineonline@gmail.com, sagemagazineonline.com
ReplyDeletehi i have cousins camp with my cousin this summer and we are gonna do alot of crafts on this blog and from trinketsinbloom.com to!!! wow im really glad i found this webisite and how do u come up with these ideas? do you just like kill 50 shirts then post like 1? hahah so yah, thanks!
ReplyDeleteThank you so much..I always draw my ideas and do it in my head first before I cut anything:) I have only messed up about 3 shirts. but I re purposed them too, so it is a win win situation.
DeleteHow do you get the front like it is? just tried...yours is 10,000x better lol. My cuts weren't the best and the back is...yeah.
ReplyDeleteWill try again lol
I've cut the t-shirt out but I'm having trouble tying the knots so it looks like the last picture
ReplyDeleteMaybe I will do a quick Video for this one to make it easier.:)
Deletewoow so cool
ReplyDeletehttp://www.ccchinachic.com/products/fashion/womens-clothing/shirts-blouses/c-116/
me encanta, lo voy a hacer esta noche
ReplyDeleteMaravilhoso <3
DeleteThis is so creative! :) Love it
ReplyDeletewud u like to follow each other? lemme knw
Maybe you have time to see my new blog post: Dazzling Bling :)
Love
Akanksha
I'm going to use this patter on similar sized t-shirts and then I'm going to tie-dye them to make swimsuit cover-ups for my girls. They'll be thrilled.
ReplyDeleteLove that idea:)
DeleteLove it!
ReplyDeletegreat ... i love it
ReplyDeleteSimply love it. Great idea. I will try with my sports T-shirt
ReplyDeleteI just made one, a black one I might add. very stylish and easy. looks great! thanx! :D any more new ideas?
ReplyDeleteThank you Shar
DeleteWorking on a whole summer of fun DIY!!!:)
Thanks so much for sharing this! I just cleaned out my closet and had a whole stack of t-shirts just waiting to be restyled ;-) So far have made a black one and a navy blue one.
ReplyDeleteThank you so much for the amazing tutorial. No sew styles are my favorites! I whipped my shit up in about 15 minutes and it looks so cool!
ReplyDeleteYour very welcome, no sews are my favorite too.:)
DeleteI made this today with an old shirt that if I ruined it I wouldn't care, but it turned out nice not sure what bra to where with it (cause I can't go without). Also I sew the straps together so I don't have to mess with it anymore. Will do this again!
ReplyDeleteAwesome, I am so glad you tried it:)
DeleteLovely ... :D
ReplyDeleteGreat design! I don't sew. So this was the perfect 20 minute project for me! I used a shirt I had tie-dyed and hated how the color came out. The alterations it makes it desirable to wear. I might even add buttons instead of tying it ... AND I used one of the sleeves at a headband - I didn't have to do anything more than stretch it over my head! I'm going to make a shirt and headband combo for my daughter with the shirt I dyed for her!! :.)
ReplyDeleteThank you so much Kate for your feed back on this project. I Love that you recycled a shirt and now are happy with it. I would also love to see a picture. :)thanks again
DeleteAnne
Loooooove it!!! One of the smartest DIY's I've seen in months
ReplyDeleteThanks and kisses from Barcelona
Marta
Thank you so very much, that is the nicest thing to hear.
DeleteWhat a great, simple, no sew, design idea! I love it! I did this with a very large mens t-shirt, it was way too loose, so I cut a slit up the back and tied it together, so it looks slightly more fitted. It looks ok, but not for wearing out...I will try this again in a small size and maybe make some as gifts too.
ReplyDeleteThank you so much. All the best.
thank you so very much
DeleteI can't believe how easy this was! Thanks so much for the step-by-step. Keep up the good work :)
ReplyDeleteThank you so much:)
DeleteThis comment has been removed by the author.
ReplyDeleteMine came out wonderful. Thank you so much!
ReplyDeleteI am so Glad:)
DeleteThis is just brilliant Anne! I love it!
ReplyDeleteThank you so much Jill:)
Deleteyeah! you helped me rescue a favorite t that i had turned into a very bad tank. looks great now and i'll definitely be wearing it again! thanks!
ReplyDeleteAwesome Kara Thank you so much for your message it makes me feel fantastic that you are doing my projects.:)
DeleteLove
Anne
hermoso!! gracias (Argentina)
ReplyDeleteThank you so much Monica:)
DeleteBeautiful...I hope this is dress code-appropriate for my school:)
ReplyDeleteThank you Adrianne:)
Deletecan you make this out of a large mens shirt if your a 12 year old girl? or would it be too big?
ReplyDeletecan you make this out of a large mens shirt if your a 12 year old girl? or would it be too big?
ReplyDeleteI think a large shirt in a mans size would be to big . maybe go with the small mens:)
DeleteThis comment has been removed by the author.
ReplyDeletecool DIY,Mine ending up not being no-sew. I'm chesty, knot kept riding up, had to tack it in place. The back ties were uncomfy, tailored them. Super cute idea though. Thanks for the inspiration!
ReplyDeletehttp://www.hicustom.com
Okay, tried this and unfortunately it ended up ugly as hell. Anything I can do to improve?
ReplyDeleteSend me a picture, I will look.
DeleteSo glad I came across your site and I'm getting on the Anne bandwagon! Love your creations because I can't sew and need to revamp my clothes so thank you!
ReplyDeleteCan't wait for my next trip to the store to get some plain tees!
Awesome Gina, and thank you for your sweet comment. XXOO
DeleteHello, good morning, my name is Ana, I have a blog, Las Cositas de Ana Mia, and a couple of times a month usually do collaborative posts or diy tutorials. I loved your post, and I ask permission to use it in my next post, which will on Wednesday 11 March. Use your photos, and put the link to your blog to see the tutorial to detail and visit you.
ReplyDeleteI await your response.
A greeting.
Hello,
ReplyDeleteAll these above shown tee shirts are looking fabulous and stylish...I liked it...The idea is quite awesome....
Tee
We at Engrave love our top brands, and so, we decided to go all out and create a list of 75 (yes, seventy five) of our favourite Women T-Shirt Makers in california, USA for you.
ReplyDeleteActually, I like this diy project's idea of recycle and upcycle.
ReplyDeleteThank you Kelsey<3
DeleteGreat idea. I like this DIY tutorial.
ReplyDeleteThank you so much Avril<3
DeleteI enjoyed reading this blog. in my opinion, everything was perfectly written there as well as few small tips are also can be taken as healthy suggestion. Descriptive informative content written in this blog is very useful.
ReplyDeletecustom tshirt printing
Great beat ! I would like to apprentice while you amend your website, how can i subscribe for a blog site? It is truly a great and useful piece of information.
ReplyDeleteacheter chemises homme
WOW just what I was searching for. Came here by searching
ReplyDeletefor snow online
My homepage: 바카라사이트
(mm)
Really appreciate this wonderful post that you have provided for us. Great site and a great topic as well I really get amazed to read this. It's excellent. Feel free to visit my website; 온라인카지노
ReplyDeleteHello i'm writing from the Bahamas came across this on pintrest thank you so much for sharing i was bit hesitant to cut my tshirt but i did and i love it
ReplyDeleteThis comment has been removed by the author.
ReplyDeleteAnyone looking to enhance their outdoor living should start by consulting expert landscape architects sydney
ReplyDelete. Sydney homes benefit so much from well-thought-out green space.
Thanks for sharing
ReplyDeleteUpgrade your wardrobe with elegant cotton formal shirts for men that offer the perfect mix of comfort and sophistication. Ideal for office wear, meetings, or formal occasions, these shirts are crafted from premium breathable cotton to keep you cool and confident all day. Pair them with trousers or blazers for a refined, professional look. If you prefer versatile styles, mens long sleeve cotton shirts are a timeless choice that ensures both style and comfort in every season. From classic whites to modern patterns, cotton formal shirts for mens are the ultimate staple for a smart and polished appearance.
I really enjoyed your post! I loved the way you explored the topic from different angles and offered practical advice. oracle remote dba services
ReplyDelete