Wednesday, December 28, 2011

Baby, its cold outside.


Shirt ~Target, Sweater~ Kohl's, faux- fur Vest~ I made here,  Black cords~ Express, Shoes~ BCBG
Bracelets~ I made.

Well, all of us  here in Central Florida  enjoyed a very warm Christmas this year.  But I have to be honest,  I am really ready for some cooler weather.  You see, we have so much  hot weather,  that I look forward to the cold weather, for a little while at least.
 It is the only way I can wear all my fun winter clothes.


I hope everyone had a wonderful Christmas,
now I have to  start thinking  about an outfit for New Years Eve.

Oh !!!
and one of my New Year's Resolution is.


Lots of <3.
Anne

Glitter and Glue Shoe Fix #2

These are my favorite flats, and you can tell because I have literally worn them out.  Because I am not quite ready to toss them away, I had to fix them. What better way to hide scuffed up leather? 
  Glitter and glue, of course!


Tutorial
Things you need

  1. Glitter
  2. Glue
  3. Paper Plate
  4. Paint brush


 First clean your shoes

Mix up a paste with your glitter and glue.

 apply to the part you want to cover

 sprinkle on some more glitter and let dry,
then shake off all the extra glitter.

coat with one final thin layer of glue.
and let that dry.


and now you have a new pair of shoes,
~ well kind of~
Another great way to fix your shoes with glitter is HERE .
Glitter  just  makes everything better.
Lots of <3!!!
Anne

Monday, December 26, 2011

Project Re-Style # 50, Faux-Fur Vest.

Fur and Faux- Fur, is so "In Style" this season.
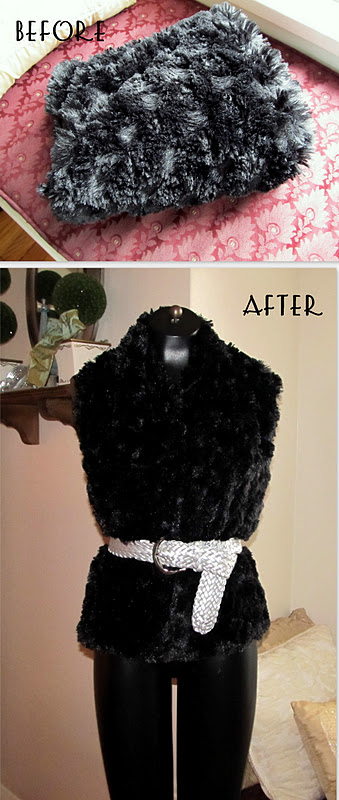
I have seen, vests, sleeves, scarves, purses,  swarming the internet, all made from fur and faux- fur.  So I decided to make a Faux- fur vest so I can have that little extra "Je ne sais pas".  Belt it, wrap it around your neck,or leave it without a belt.   
This was a perfect project for me,  
because I am a big fan of Versatile and changeable.  
Welcome everyone,  to my Project Re-Style Monday.  
This week I made a faux fur, vest/ scarf/ wrap.
 You can add a belt  to it  to make a vest, or leave it to have a scarf, or just wrap it around your shoulders.
(This ONE Blanket has come in so handy.)


Inspiration


 Tutorial
 Things you need.
  1. Faux fur( mine was a blanket) 
  2.  I cut my piece 48 inches long, by 11 inches wide
  3. Scissors
  4. Pins ( to pin it together before you sew it )
  5.  Sewing machine.


First, I cut out the shape above.
Cut, where there is a green line.
Sew, where there is a red line.
If you use the edge of the blanket you only have to sew one side.
I cut mine in the middle of the blanket and so I had to sew all the way around.
 Believe it or not, that is all there is to it.
 Now you can,

 Belt it, like this.

or Wrap it around your neck 
Like this.


or wrap it around your shoulders like this.

 I think I might add this to my New Years Eve outfit.
 See how I wore it HERE.

50 down 2 to go!
Click on the picture above
for all the details 
about Project Re-Style.
Lots of <3,
Anne


Sunday, December 25, 2011

Wishing all of you a Wonderful Christmas Day!!

Lots of <3,
Anne

Friday, December 23, 2011

Little Black Dress # 2


Faux Fur Scarf I made HERE

  Multi-Chain necklace I made HERE

 Shoes ~Nine West
Gold Clutch I made HERE.

This is a Little Black Dress I purchased for a New Years Eve Party  about 4 years ago. I love the simplicity of it.  I can change this dress,  just by changing the  accessories.  If you are trying to pick out a dress that is going to have  that ( last -ability) aspect, pick one that has  a simple shape, and one with clean lines.  Think Audrey Hepburn, in Breakfast at Tiffany's. 

Have a wonderful Friday.
Lots of <3, and
Merry Christmas!
Anne

Wednesday, December 21, 2011

One Little Black Dress or Two


Do you have one?
You know,  A black dress you could pull out and wear at a moments notice.  I suppose the the necessity in a LBD is having something to wear when nothing else works.  I just Re-styled  this  one.   But I do have one more which I will post tomorrow.  The other one is also simple and classic. The best thing about the simple black dress is you can change it with the accessories you wear.
Every Girl needs one or two.:).


Monday, December 19, 2011

Project Re-Style #49 Lace up your LBD.

Happy Monday Everyone! 
Sorry, but this post is going to be short and sweet I hope!
Busy, Busy, Busy
is the name of the game and I know all of you are feeling the exact  same way.
So in order to save time I am hoping this post will be short and to the point.
 a Wool blend,LBD (Little Black Dress) from the Gap.
Re-Style~ Lace it up.
I thought that this dress was just a little too short for me, so I added 6 inches of lace.

Tutorial
Things you need
  1. Lace 
  2. Sewing machine 
  3. Scissors
  4. Pins
First I cut my lace 
36 inches long by 6 inches wide.
Then I stitched the two ends  together 
Turn your dress inside out and pin the lace onto the dress

Side
I made a gather on one side,
and  I sewed all the way around
with the sewing machine.

 Front
Back
I liked it before,
now I love it!
I am thinking, maybe, New Years Party or Dinner.

Gotta run!
Have a wonderful night!!


49 down 3 to go
Click on the picture above 
for all the details about
Project Re-style.
Lots of <3,
Anne

Saturday, December 17, 2011

Glitter Your Candles, DIY

Happy one week before Christmas everyone!
  My Christmas shopping has officially begun. I always save all my Christmas shopping until the week before Christmas.  I did cheat a little this year, I bought a few gifts yesterday and because I am making most of the things that I am giving away, I started on that about a month ago.
This DIY was because I had a candle problem, the Problem being, I wanted to fix my silver candles that were peeling and looking a tad bit ugly. So What did I do?   Glitter them of course.  This would be a great way to dress up your candles for that  Christmas or New Years Eve Party.  And ....it only took me about 20 minutes to do all 6 candles.

Tutorial
Things You Need


  1. Candle
  2. Pretty glitter
  3. Glue
  4. Paint brush
  5. Pie pan
Paint your candle with glue

Cover with Glitter

let dry.
Then put a coat of Mod Podge on it and let that dry.
That keeps the glitter from getting everywhere.

Now your Old candles look like new ones.
I guess  this  could be considered a Re-Style.

Have a great Saturday!!
Lots of <3
Anne
Linking to
Sew Stylish Boutique