Happy Monday Poppets!
I hope your week has started out perfectly. I wanted to let you know that for the next 3 weeks I will be working with different ways to Re-Style a T-Shirt, for my Project Re- styles. Why is that you ask? Well because the class I am teaching has no access to sewing machines, and there is little or no sewing involved in my t-shirt designs. I am going to push my imagination, as well as the imagination of my students by re working T-shirt as many ways as I can.
While I was thinking about this idea, over a nice steamy bowl of homemade chicken soup and some very tasty oyster soup crackers, the little saying on the oyster soup cracker box caught my attention. It says at the very bottom in a very plain font, "The World is Your Oyster Cracker." I started to think about this, and wondered what exactly does this saying mean? Does it mean I am the oyster and the pearl is the life I make with it, or I am the pearl and I am what my world shaped me to be or am I a grain of sand? I don't even like Oysters. I did go and look it up and it says it means.
If the world is your oyster then it is a place where you can get something of great value with ease.
Origin:
It comes from Shakespeare - The Merry Wives of Windsor (1600). The world is the place from which one can extract success and profit, as a pearl can be extracted from an oyster.
Falstaff: I will not lend thee a penny.
Pistol: Why, then the world's mine oyster, which I with sword will open.
(Act 2, Scene 2)
--------------------------------------------------------------------------------
Getting the pearl requires the oyster to be opened. But despite the hardness of the oyster shell, they can be opened with ease. Oyster shells are held closed by a single muscle called the adductor. Oysters are shucked (opened) using a thin knife to cut the adductor muscle. Once the adductor is cut, the shell falls open.
If the world is your oyster then it is a place where you can get something of great value with ease.
--------------------------------------------------------------------------------
Well, I have nothing against pearls, but I want my oyster to make a BIGGGGGG Diamond, so I can extract it.
What do you want your Oyster to make?
Thank you Dimi, for showing me where this saying actually comes from.
Now for Re-Style #29
T-shirt into a off the shoulder, side gathered, shirt.
Tutorial
Things you Need
1. Shirt
2.Scissors
3. Needle and thread
4. Cord or ribbon 14 inches long.
5. Extra material for the side gathering. 3inches by 6 inches
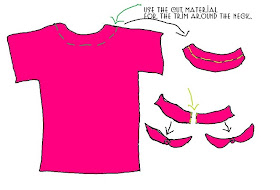
6. And any extra material for around the collar. I used what I cut off.
1.Cut the collar to the size you want. Try on your shirt and mark where you want it.
2.Turn your shirt inside out and on the side you want to gather fold your cord in half, place down your cord with the 3 by 6 material on top and stitch around it leaving the bottom open. Make sure you stitch the top of the cord where the cord is folded in half.
3 Turn your shirt right side out and take the extra pieces you cut off the collar, cut them into two pieces and tie a knot in the middle of each one.
4.Hand stitch them to the top collar.
5. I added a piece of gray t-shirt I had left over, tied the two pieces into a knot and hand stitched that on the shirt.
6. I gathered up the sleeves the same way I did in project Re-Style #27
HERE
7. Then gather up your cord on the side and tie it into a bow.
I added wooden beads to the end of each cord.
And with that you are done.
YAY!
Wasn't that fun, and quick.
If you have any questions, Please email me.
wobisobi@gmail.com
29 down 23 to go
click the picture for all the details
about Project Re-Style.
Have a wonderful night everyone.
I have a another great class this week .
I cannot wait to show you what they are doing..
<3


